Docker Container Lifecycle

Docker containers have revolutionized application development and deployment, enabling lightweight, consistent environments across systems. Understanding how to manage these containers effectively is critical for optimizing performance and ensuring scalability in your projects. In this guide, we'll explore key aspects of managing Docker containers, focusing on workflows, commands, best practices, and a practical case study.
In this section, we’ll cover the following topics:
- Overview of Docker Container Lifecycle
- Managing Container Lifecycle with CLI for Basic Operations
- Case Study: Using NGINX with Docker Containers
- Managing Containers with VS Code Docker Extension
Overview of Docker Container Lifecycle
Docker containers follow a well-defined lifecycle, from creation to removal. Understanding this lifecycle is crucial for efficient container management.
Lifecycle of a Docker Container
- Created: A container is created from a Docker image using the
docker createordocker runcommand. At this stage, it exists but is not running. - Running: The container starts executing its processes when launched with
docker startordocker run. In this state, the container consumes system resources such as CPU and memory. - Paused: Optionally, a container's processes can be temporarily frozen using
docker pause. This stops CPU usage while keeping the container in memory. - Stopped: When a container completes its task or is explicitly stopped with
docker stop, it transitions to a "stopped" state. The data inside the container remains accessible, but the processes are no longer running. - Removed: A container is deleted using the
docker rmcommand, removing its metadata, filesystem, and state from the system.
Containers Are Disposable
Docker containers are designed to be ephemeral and disposable. This disposability is one of their key strengths, allowing rapid creation, scaling, and deletion. However, this also introduces challenges, particularly regarding data persistence:
- Volatile Nature: By default, all data stored inside a container is lost when the container is removed.
- Risk of Data Loss: If important data is stored within the container’s filesystem and the container is deleted, the data is permanently lost.
To address this, persistent data storage solutions like volumes or bind mounts can be used to separate critical data from the container’s lifecycle. We will explore data persistence in greater detail in Chapter 4.
Managing Container Lifecycle with CLI for Basic Operations
The Docker CLI offers a comprehensive set of commands to manage containers throughout their lifecycle. This guide focuses on essential operations that every beginner must master, such as creating, running, stopping containers, monitoring their status, and cleaning up unused resources. Advanced commands and techniques will be explored in the next guide.
1. Running a Container
The docker run command combines the functionality of container creation, configuration, and startup in one step. It not only creates and starts the container (similar to docker create and docker start) but also allows for container configuration, such as setting environment variables, volume mounts, and port mappings. Additionally, if the specified image is not present locally, docker run will automatically pull it from the Docker registry.
docker run
How it works:
- Creates and configures the container.
- Starts the container processes.
- Pulls the image if it is not available locally.
Impact:
The container is instantiated with specified container configurations and moves to the "running" state.
Command Syntax:
docker run <options> <image_id_or_name>
Explanation of Syntax:
-d: Runs the container in detached mode.-p: Maps a host port to the container port. (Note: A detailed explanation of ports will be covered in Chapter 4.)--name: Assigns a custom name to the container, making it easier to reference.
Command Example:
docker run -d -p 8080:80 --name my_nginx_container nginx
Explanation:
-d: Runs the container in detached mode (background).-p 8080:80: Maps port 8080 on the host to port 80 inside the container.--name my_nginx_container: Names the containermy_nginx_containerfor easier identification.nginx: Uses the official NGINX image to launch a web server.
Access at http://localhost:8080.
Detached Mode vs. Attached Mode
When running a Docker container, you can choose between detached mode and attached mode. Here’s a breakdown of the two:
Detached Mode (-d)
- Behavior: Runs the container in the background, freeing up your terminal for other commands.
- Output: No direct output in the terminal; the container runs silently.
- Use Case: Ideal for running long-lived services or applications that don’t require direct interaction.
Example:
docker run -d -p 8080:80 nginx
Attached Mode (Default, no -d flag)
- Behavior: Runs the container in the foreground, with its output (logs, etc.) displayed in your terminal.
- Output: You can see the container’s logs and output in real-time.
- Use Case: Useful when you need to interact with the container’s process or need real-time feedback, such as for debugging or testing.
Example:
docker run -p 8080:80 nginx
Which is More Common?
- Detached mode is more commonly used in production or for services that need to run in the background, like web servers, databases, etc. Most of the time, containers are launched in detached mode, especially for persistent, long-running applications.
- Attached mode is typically used in development, debugging, or when you need to monitor real-time logs.
docker create + docker start vs. docker run -d
- Detached Mode with
docker run -d: If you usedocker run -d, it’s equivalent to creating a container and then starting it in detached mode. The container is created and starts running in the background with no terminal output. - Detached Mode with
docker create+docker start: If you usedocker createand thendocker start, you get the same result asdocker run -d, but with an additional step of manually creating the container before starting it in detached mode.
2. Creating a Container
The docker create command initializes a new container from a Docker image without starting it. Use it to configure a container before execution.
docker create
How it works:
- Prepares a container with the specified configurations.
- Does not execute the container’s processes until
docker startis used.
Impact:
Creates a container in the "created" state.
Command Syntax:
docker create <image_id_or_name>
Explanation of Syntax:
--name: Assigns a custom name to the container, making it easier to reference later.
Examples:
Without --name:
docker create ubuntu
Docker assigns a random container name.
With --name:
docker create --name my_container ubuntu
The container is explicitly named my_container.
Note: The docker create command is less commonly used directly by most Docker users. It’s typically used when you need to set up a container with specific configurations before actually running it, or if you want to create a container without starting it immediately. However, in practice, most users prefer to use docker run because it combines both container creation and starting the container into a single command, making it more convenient for everyday tasks.
3. Listing Containers
The docker ps command shows all running containers by default. Add the -a option to include stopped containers in the list.
docker ps
How it works:
- Queries the Docker daemon to display active container data.
Impact:
Provides real-time visibility into running containers.
Command Syntax:
docker ps
Explanation of Syntax:
-a: Includes all containers (running, stopped, and exited) in the output instead of only showing running ones.
Example Output: When using docker ps -a, the output might look like this:

Explanation of Output:
CONTAINER ID: The unique identifier for the container.IMAGE: The Docker image used for the container.COMMAND: The command being executed in the container.STATUS: Displays whether the container is running (Up), stopped (Exited), or created (Created).PORTS: Indicates port mappings for running containers.NAMES: The custom or auto-generated name for the container.
4. Stopping a Container
The docker stop command gracefully shuts down a running container, allowing processes to terminate cleanly.
docker stop
How it works:
- Sends a
SIGTERMsignal to the main process. - Sends a
SIGKILLsignal if the container does not stop within a timeout.
Impact:
The container transitions to the "stopped" state.
Command Syntax:
docker stop <container_id_or_name>
Command Example:
docker stop my_container
5. Starting a Container
The docker start command starts a previously created or stopped container, resuming its processes.
docker start
How it works:
- Launches the container’s processes using the original configuration.
Impact:
Transitions the container to the "running" state.
Command Syntax:
docker start <container_id_or_name>
Command Example:
docker start my_container
docker run vs. docker start
Both docker run and docker start are used to start containers, but they differ in how they handle container creation and initialization, making it crucial to understand their distinctions for appropriate use.
|
Aspect |
docker run |
docker start |
|
Functionality |
Creates and starts a container in one step. |
Starts an already created container. |
|
Container Creation |
Creates a new container from the specified image. |
Requires the container to be pre-created (via |
|
Image Pulling |
Automatically pulls the image if it doesn’t exist locally. |
Does not pull the image; assumes the image is available locally. |
|
Port Mapping ( |
Can specify port mappings with |
Port mappings must be specified during container creation ( |
|
Detached Mode ( |
Supports |
Starts the container in the mode it was originally run (foreground or background). |
|
Use Case |
Ideal for starting new containers or launching containers in one command. |
Useful when starting a container that was previously created or stopped. |
|
Example Command |
|
|
Understanding the differences between docker run and docker start helps ensure you use the appropriate command depending on whether you need to create a new container or simply start an existing one.
6. Removing a Container
The docker rm command deletes a stopped container entirely, clearing it from the system.
docker rm
How it works:
- Deletes the container’s metadata and state.
- Requires the container to be in a "stopped" state.
Impact:
The container is permanently removed.
Command Syntax:
docker rm <container_id_or_name>
Command Example:
docker rm my_container
Case Study: Using NGINX with Docker Containers
This case study illustrates managing Docker containers with a real-world example using NGINX.
Step 1: Running the NGINX Container
To start the NGINX container, follow these steps:
Use the docker run command to launch the container with a specific name:
docker run -d --name nginx_container -p 8080:80 nginx:latest
Explanation:
-d: Runs the container in detached mode (in the background).--name nginx_container: Assigns the namenginx_containerto the container for easier identification.-p 8080:80: Maps port 8080 on your host to port 80 inside the container.nginx:latest: Specifies the image to use.
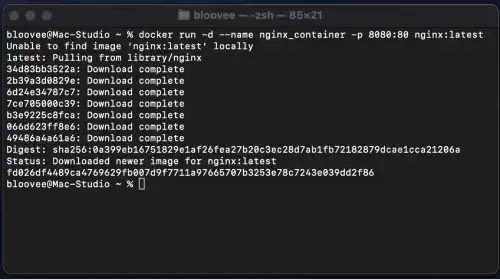
The docker run command includes the functionality of docker pull and will automatically pull the image if it is not available locally.
Confirm the container is running:
docker ps
This command lists active containers. Look for nginx_container in the output.
Step 2: Accessing the Web Server
Open your web browser and access http://localhost:8080. You should see the default NGINX welcome page, confirming the server is running.

Step 3: Stopping the Container
Stop the NGINX container:
docker stop nginx_container
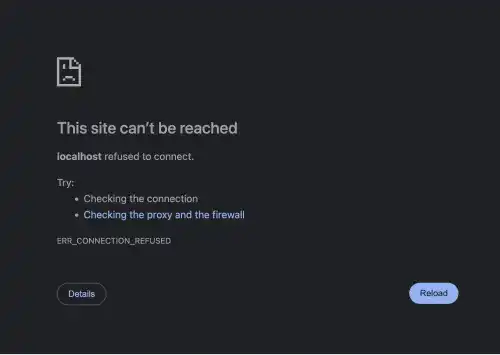
Open your browser again and refresh http://localhost:8080. You will notice the page is no longer accessible since the container has stopped.
Step 4: Starting the Container
Restart the stopped container:
docker start nginx_container
Open your browser and refresh http://localhost:8080. The NGINX welcome page should reappear, indicating the container is running again.
Step 5: Cleaning Up the Environment
Stop and remove the container:
docker stop nginx_container
docker rm nginx_container
Remove the NGINX image if it is no longer needed:
docker rmi nginx:latestr
Summary of Steps
Step 1: Run the NGINX container using docker run, assigning a specific name and mapping ports.
Step 2: Access the web server via http://localhost:8080.
Step 3: Stop the container using docker stop and verify the server is no longer accessible.
Step 4: Restart the container using docker start and confirm the server is accessible again.
Step 5: Clean up the environment by stopping and removing the container and image.
Managing Containers with VS Code Docker Extension
You can also manage the Docker container lifecycle using the VS Code Docker Extension. This extension provides a graphical user interface (GUI) to interact with Docker, making container management more intuitive.
Container Management
At the top left panel, you can see a list of running and stopped containers.
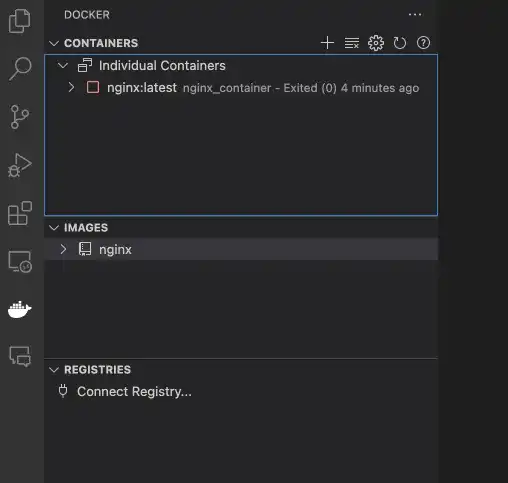
By right-clicking on a container name, you can execute Docker commands, including:
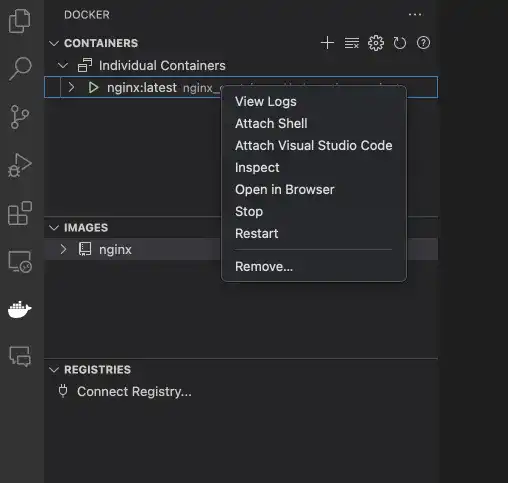
- Start a stopped container.
- Stop a running container.
- Restart a container.
- Remove a container.
Additionally, you can inspect logs and open an interactive terminal within a running container.
Exploring Container Files
The extension allows you to browse files inside a running container, making it easier to inspect and debug containerized applications.
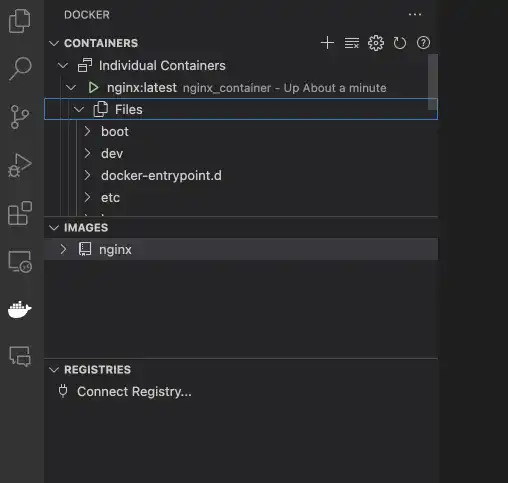
Image Management
Below the container section, you can view, pull, and remove Docker images.
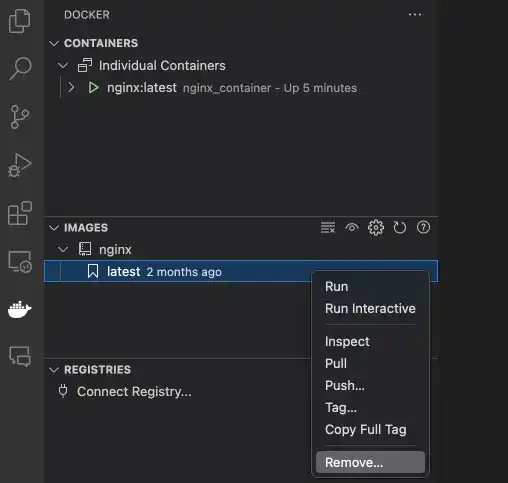
By integrating essential Docker functionalities into a visual interface, the VS Code Docker Extension simplifies container management, making it a convenient tool for both beginners and experienced users.
Reference links: