Docker Images and Registries (Docker Hub)

Docker images and registries form the foundation of efficient containerization workflows. Docker Hub, a popular registry, simplifies image management and distribution. In this guide, we explore Docker images, registries, and how to leverage Docker Hub for streamlined containerization.
In this section, we’ll cover the following topics:
- What are Docker Images?
- What are Image Registries and Docker Hub?
- Docker Image Life Cycle with CLI - Basic Operations
- Case Study: Running a Web Server Using a Docker Image from Docker Hub
- Docker Image Life Cycle with CLI - Organizing and Sharing Images
- Summary of Docker Image-related Commands
What are Docker Images?
A Docker image is like a blueprint or template for creating Docker containers. It's a read-only file that contains all the instructions, libraries, dependencies, and files needed to run an application within a container.
Think of it like a recipe for a cake. The recipe (Docker image) includes all the ingredients and instructions needed to bake the cake (Docker container). You can use the same recipe to bake multiple cakes, and each cake (container) will be independent of the others.
Key Characteristics of Docker Images
Layered Structure
Docker images are built using a layered architecture, where each layer represents a change to the image. This layering system allows for efficient storage and sharing by reusing layers across multiple images.
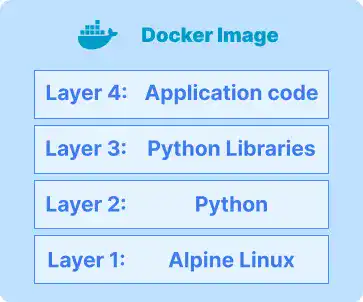
For example:
- The base layer might contain a minimal operating system like
alpine. - The next layer could include a runtime, such as Python or Node.js.
- A subsequent layer might add application dependencies installed via
pipornpm. - Finally, the top layer includes the application code itself.
If two images use the same base layer (e.g., alpine), Docker only downloads or stores it once, reducing redundancy.
Read-Only
Docker images are immutable; you cannot change an image after it's created. Instead, any modification results in a new image.
Portable
Docker images can be transferred between environments, ensuring that an application runs the same way regardless of where it is deployed.
Self-Contained
Images include all the dependencies, configurations, and tools needed to run the application, eliminating compatibility issues.
What are Image Registries and Docker Hub?
Image registries are centralized systems for storing, managing, and distributing Docker images, enabling developers to share and retrieve images efficiently. While Docker Hub is the most commonly used registry, other options like Amazon Elastic Container Registry (ECR), Google Artifact Registry (GAR), and self-hosted private registries offer additional flexibility and security for different use cases.
Image Registry Overview
An image registry serves as a repository where Docker images are stored, versioned, and accessed.
Purpose of an Image Registry
- Storage: Securely stores Docker images for easy retrieval.
- Distribution: Allows users to download and share images globally.
- Versioning: Tracks different versions of the same application, ensuring consistency across deployments.
- Access Control: Manages permissions, enabling public, private, or restricted access to images.
- Public Registries: Open for anyone to access and contribute images (e.g., Docker Hub).
- Private Registries: Hosted within organizations or private clouds, offering enhanced security and control.
- Self-Hosted Registries: Custom registries deployed on local infrastructure, providing full ownership and customization.
Types of Image Registries
Docker Hub
Docker Hub is the default and most widely used public image registry, providing an extensive ecosystem for storing and distributing Docker images.
Key Features of Docker Hub
- Vast Library: Hosts official and community-contributed images for operating systems, applications, and programming languages.
- Official Images: Provides verified, pre-built images for popular software to ensure security and reliability.
- Automated Builds: Supports automated image creation from GitHub and Bitbucket repositories.
- Organizations and Teams: Enables collaborative workflows by managing shared repositories.
- Webhooks: Integrates with CI/CD pipelines, triggering automated deployments.
Docker Hub is the best starting point for sharing and managing Docker images due to its ease of use, vast library, and seamless integration with Docker.
Docker Image Life Cycle with CLI - Basic Operations
The Docker image life cycle encompasses the stages a Docker image goes through, from creation to removal, enabling developers to manage images effectively. As a beginner, it’s crucial to start with four fundamental tasks:
- Listing images stored on your local computer.
- Pulling images from Docker Hub, a central image repository.
- Building custom images tailored to your application’s needs.
- Pruning unused images to free up storage and maintain a clean environment.
These basic operations form the foundation for understanding and using Docker images.
1. Listing Images
To view all Docker images available on your local machine, you can use either of the following commands:
docker image ls
docker image ls
Output Example:
REPOSITORY      TAG       IMAGE ID       CREATED         SIZE
nginx           latest    aabbccddee01   3 days ago      133MB
my-app          1.0       fghij1234567   2 weeks ago     45MB
Explanation:
- REPOSITORY: The name of the image repository (e.g.,
nginx,my-app). - TAG: The specific tag (version) of the image (e.g.,
latest,1.0). - IMAGE ID: A unique identifier for the image.
- CREATED: How long ago the image was created.
- SIZE: The size of the image in your local storage.
docker images
The docker images command is a shorthand version of docker image ls. It produces the same output and provides the same details:
docker images
When to Use These Commands
- Check Available Images: Quickly see which images are stored locally and their details.
- Cleanup Decisions: Identify unused or outdated images to remove.
- Image Verification: Ensure specific images (e.g.,
nginx:latest) are available before running containers.
These commands are foundational for managing Docker images and understanding your local environment.
Tags
A tag in Docker is a label or identifier used to differentiate and version Docker images. It is a part of the full image name and helps specify which version of an image you want to pull, build, or run.
Structure of a Docker Image Name
The general structure of a Docker image name is:
<registry>/<repository>:<tag>
- Registry: The location where the image is stored (e.g., Docker Hub, Amazon ECR).
- Repository: The name of the image (e.g.,
nginxormy-app). - Tag: An optional label to identify a specific version of the image (e.g.,
latest,1.0,v2.3.4).
If no tag is specified, Docker defaults to using the latest tag.
Why Use Tags?
Tags are used to:
- Version Images: Different tags represent different versions of the same image (e.g.,
nginx:1.21,nginx:1.22). - Ensure Consistency: By specifying a tag, you ensure you are using the exact version of an image in development or production.
- Facilitate Updates: Tags like
latestcan be used to always reference the newest version of an image, while versioned tags (v1.0,v2.0) provide stability.
2. Pulling Images
To download a Docker image from a registry, such as Docker Hub, you can use the docker pull command. This command retrieves the specified image and stores it locally, allowing you to use it to create containers.
docker pull
docker pull <repository>:<tag>
<repository>: The name of the image repository (e.g.,nginx,mysql).<tag>: The specific version of the image to pull (e.g.,latest,1.0). If no tag is specified, Docker defaults to thelatesttag.
Command Example:
docker pull nginx:latest
Output Example:
latest: Pulling from library/nginx
a603fa5e3b41: Pull complete
5b7339215d1d: Pull complete
14ca88e9f672: Pull complete
Digest: sha256:abc123exampledigestvalue
Status: Downloaded newer image for nginx:latest
docker.io/library/nginx:latest
Explanation:
- Pulling from library/nginx: Docker retrieves the image from the official NGINX repository.
- Pull complete: Indicates successful download of image layers.
- Digest: A unique identifier (SHA256 hash) for the pulled image.
- Status: Confirms the image has been downloaded.
The docker pull command is a fundamental tool for retrieving and preparing Docker images for container deployment.
3. Building Images: docker build
The docker build command allows you to create custom Docker images by specifying a set of instructions in a Dockerfile. This command is essential for tailoring containerized environments to meet the specific needs of your application.
docker build
docker build -t <repository>:<tag> <path_to_dockerfile>
<repository>: The name of the image repository (e.g.,my-app,custom-image).- The
-tflag tags the image, making it easier to identify. <tag>: The specific version of the image (e.g.,1.0,v2). Tags help identify image versions.
Command Example:
docker build -t my-app:1.0 .
In Chapter 5, we’ll dive deeper into custom image creation with Dockerfiles, enabling you to optimize your containerization journey.
4. Removing Images
Managing disk space and keeping your Docker environment clean often involves removing unused or unnecessary images. This section covers two key approaches:
- Pruning Unused Images for bulk cleanup.
- Removing a Specific Unused Image for precise management.
docker image prune
The docker image prune command removes unused or dangling images. A dangling image is an image layer that is no longer referenced by any tagged image.
Syntax:
docker image prune
By default, this command removes only dangling images (layers without tags).
Optional Flags:
- Remove all unused images: Use the
-aflag to remove all unused images, not just dangling ones:
docker image prune -a
- Force confirmation: Add the
-fflag to skip the confirmation prompt:
docker image prune -f
Example:
docker image prune -a
Output:
WARNING! This will remove all unused images.
Are you sure you want to continue? [y/N] y
Deleted Images:
sha256:123abc456def789ghi101jkl112mno
sha256:234bcd567efg890hij202klm223nop

Total reclaimed space: 1.2GB
Explanation:
- Deleted Images: Lists the IDs of the removed images.
- Total reclaimed space: Displays the disk space freed by the operation.
docker rmi
The docker rmi command allows you to manually delete a specific image from your local system. This is useful when you want to remove a single image without affecting others.
Syntax:
docker rmi <image_id_or_name>
<image_id_or_name>: The unique ID or name of the image to be removed. Use thedocker image lscommand to find available images.
Example 1: Remove an Image by Name
docker rmi nginx:latest
Example 2: Remove an Image by ID
docker rmi aabbccddee01
Forcing Removal
If an image is in use by stopped containers, Docker will block its removal. To force deletion, use the -f flag:
docker rmi -f nginx:latest
Caution: Forcing image removal may leave dependent containers in an invalid state.
Best Practices for Removing Images
- Prune Regularly: Use
docker image pruneperiodically to remove unused images and save disk space. - Review Images Before Pruning: Use
docker image lsto identify unused images. - Avoid Forcing Removal: Only use
-fwhen absolutely necessary, and understand the impact on dependent containers.
Efficient image management is crucial for a clean Docker environment. The docker image prune command removes unused images in bulk, while docker rmi offers precise control to delete specific images. Together, they help optimize storage and maintain an organized setup.
Case Study: Running a Web Server Using a Docker Image from Docker Hub
This case study demonstrates how to set up and run a web server using Docker Hub, specifically using the NGINX web server image. Below is a step-by-step guide:
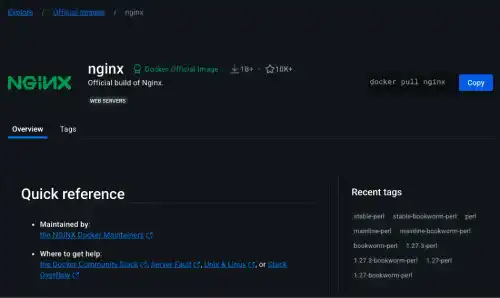
Step 1: Finding a Docker Image on Docker Hub
- Open your web browser and navigate to Docker Hub.
- Use the search bar to find the NGINX image.
- Click on the NGINX image to review its details, including tags, usage instructions, and supported architectures.
Step 2: Pulling the Image
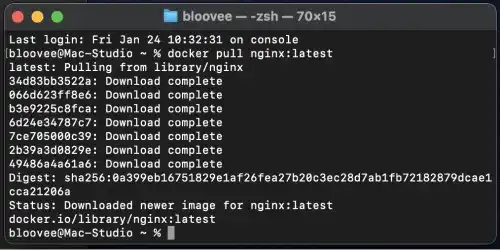
- Open your terminal or command prompt.
- Use the
docker pullcommand to download the NGINX image
docker pull nginx:latest
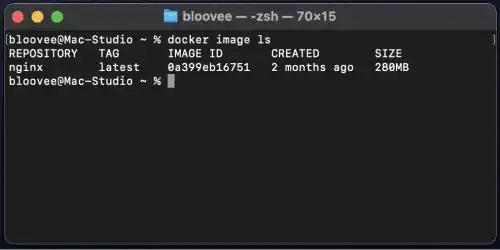
Verify the download by listing your local Docker images.
docker image ls
Step 3: Running the NGINX Container
Use the docker run command to create and start the container using the docker image. (Note: The docker run command will be explained in the next section. Since docker run includes the functionality of the docker pull command, you can skip Step 2. However, Step 2 is shown for explanatory purposes.)
docker run -d -p 8080:80 nginx:latest
Explanation:
-d: Runs the container in detached mode (in the background).-p 8080:80: Maps port 8080 on your local machine to port 80 inside the container.nginx:latest: Specifies the NGINX image to use.
Step 4: Accessing the Web Server
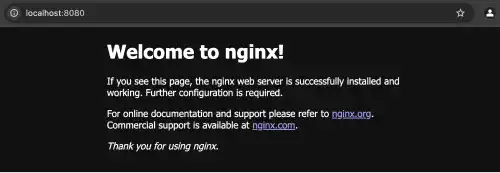
Open your web browser and enter this URL: http://localhost:8080. You should see the default NGINX welcome page, confirming the server is running.
Step 5: Cleaning Up Docker Container and Image
Cleaning up ensures that unnecessary containers and images don’t take up disk space, keeping your Docker environment optimized.
Stop the Container:
Use the docker stop command to stop the running NGINX container:
docker stop <container_id>
Replace <container_id> with the ID of your running container, which you can find using:
docker ps
Remove the Container:
Delete the stopped container with:
docker rm <container_id>
Remove the Docker Image:
If you no longer need the NGINX image, remove it using:
docker rmi nginx:latest
You can confirm that the docker image has been removed using:
docker images
Summary of Steps
Step 1: Locate and review the NGINX image on Docker Hub, including its tags and usage instructions.
Step 2: Use the docker pull command to download the NGINX image locally and verify it with docker image ls.
Step 3: Start the container using the docker run command, mapping port 8080 on your local machine to port 80 in the container.
Step 4: Open your web browser and navigate to http://localhost:8080 to confirm the NGINX web server is running.
Step 5: Stop and remove the container with docker stop and docker rm. If no longer needed, remove the image using docker rmi to optimize disk space.
Docker Image Life Cycle with CLI - Organizing and Sharing Images
Once you are comfortable with Docker image basic operations, you can explore more advanced features to organize and share images. For example, you can add tags to your images for version control and better organization, or push your images to Docker Hub to share them with others. These techniques are explained in more detail in Chapter 5. Here are a brief explanation of each technique.
- Tagging Images with
docker tag: Assigns a readable name and version to an image for easy identification. - Logging In with
docker login: Authenticates the CLI with a registry (e.g., Docker Hub) to enable secure image management. - Pushing Images with
docker push: Uploads tagged images to the registry for others to access. - Logging Out with
docker logout: Ends the authenticated session to prevent unauthorized access.
By using these commands effectively, you can ensure your Docker images are well-organized, securely managed, and easily shareable.
Summary of Docker Image-related Commands
Here’s a quick reference for the image-related commands covered:
|
Command |
Description |
|
|
List all images on the local system. |
|
|
Download an image from a registry. |
|
|
Build a new image from a Dockerfile. |
|
|
Remove unused or dangling images. |
|
|
Remove one or more Docker images. |
|
|
Tag an image with a repository name and version. |
|
|
Upload an image to a registry. |
|
|
Authenticate with a registry. |
|
|
Log out from a registry. |
The Docker image life cycle helps maintain a clean, organized environment and ensures efficient management of Docker images.