Sharing Your Docker Images

Sharing Docker images is a crucial step in containerized application workflows. By sharing images, you enable collaboration, ensure portability, and simplify deployment across various environments. Docker Hub, the most popular public image registry, offers a streamlined process for distributing images. Whether you're a developer working on personal projects or a team collaborating on enterprise solutions, understanding how to share Docker images efficiently is essential.
In this section, we’ll cover the following topics:
- Key Steps to Share Docker Images
- Managing Docker Image Sharing Process with Docker CLI
- Case Study: Docker Image Sharing with Docker Hub
Key Steps to Share Docker Images
Sharing Docker images involves preparing your images, uploading them to a registry, and managing their accessibility. Docker Hub simplifies this process, offering a public and private registry for image distribution. Below, we explore where and how to share Docker images.
Where to Share Docker Images: Docker Hub
Docker Hub is the most widely used registry for sharing Docker images. It allows developers to:
- Share public images for open-source projects or collaborations.
- Host private repositories for secure team sharing.
- Enable automated builds and image versioning.
While Docker Hub is the default option, other registries like AWS Elastic Container Registry (ECR) or Google Artifact Registry may be suitable for specific needs.
Workflow to Share Docker Images
Sharing Docker images involves a straightforward workflow:
- Tag Your Image: Assign a meaningful name and version tag to your Docker image. Tags help identify specific builds or versions of your application.
- Log In to a Registry: Authenticate with the target registry to gain permission to upload your images.
- Push the Image: Upload the tagged image to the registry.
- Verify the Upload: Check the registry (e.g., Docker Hub) to ensure the image is successfully uploaded.
- Log Out from the Registry: For security, log out from the registry after completing your tasks.
By following these steps, you ensure your Docker images are organized and easily accessible for use.
Managing Docker Image Sharing Process with Docker CLI
The Docker CLI provides a robust suite of commands to simplify the process of sharing Docker images, from tagging and logging in to securely pushing them to a registry. Here’s a refined breakdown of the key steps.
Tagging Images with docker tag
Tagging adds a human-readable name and version to your Docker image. It is essential for identifying and managing images in a registry. Beyond sharing, tagging serves other purposes, such as:
- Version Control: Differentiating between stable releases (e.g.,
v1.0) and updates (e.g.,v1.1). - Environment Organization: Categorizing images by deployment stages like
dev,staging, orprod.
docker tag
The docker tag command assigns a new repository name and/or tag to an existing Docker image.
Syntax:
docker tag <source_image>:<source_tag> <target_repository>:<target_tag>
<source_image>: The current name of the image, as shown indocker image ls(e.g.,my-app).<source_tag>: The current tag of the image (e.g.,latestor1.0).<target_repository>: The new repository name for the image (e.g.,my-dockerhub-username/my-app).<target_tag>: The new tag for the image (e.g.,v1.0,prod).
Example:
docker tag my-app:latest my-dockerhub-user/my-app:v1.0
Logging In to a Registry with docker login
Before pushing images to a registry, you must authenticate using the docker login command. This step secures communication and grants access to manage images in your account.
docker login
Syntax:
docker login
You’ll be prompted to provide your username and password. Once authenticated, your CLI is linked to the registry, such as Docker Hub, enabling image pushes and pulls.
Pushing Images to a Registry with docker push
After tagging and logging in, use the docker push command to upload your image to the registry. The uploaded image becomes accessible for downloading by collaborators or users.
docker push
Syntax:
docker push <repository>:<tag>
Example:
docker push my-dockerhub-user/my-app:1.0
Logging Out from a Registry with docker logout
To maintain security, especially on shared systems, it’s important to log out from the registry after completing your tasks. The docker logout command terminates your authenticated session.
docker logout
Syntax:
docker logout
This ensures that your credentials are no longer stored locally, reducing the risk of unauthorized access.
Case Study: Docker Image Sharing with Docker Hub
Sharing Docker images is an essential practice for developers managing containerized applications. This case study provides a practical walkthrough of creating, building, and sharing a Docker image using a personal Docker Hub repository. From setting up the project folder to cleaning up by deleting the image, this guide ensures every step is clear and actionable.
Step 1: Set Up the Project Folder
Start by creating a project folder to organize all necessary files.
Create a directory named docker-image-sharing-demo and navigate into it:
mkdir docker-image-sharing-demo
cd docker-image-sharing-demo
Inside the folder, create the required files using the touch command:
touch Dockerfile server.js package.json
You now have an empty folder with the files needed to proceed:
Dockerfile: Defines how the Docker image is built.server.js: Contains the application code for a simple Node.js server.package.json: Manages dependencies and metadata for the Node.js app.
Step 2: Create a Simple Dockerfile
The Dockerfile specifies how the Docker image will be built. Add the following content to the Dockerfile:
Dockerfile:
# Use an official Node.js runtime as the base image
FROM node:16-alpine

# Set the working directory
WORKDIR /app

# Copy the application code
COPY . .

# Install dependencies
RUN npm install

# Expose the application port
EXPOSE 3000

# Command to start the application
CMD ["node", "server.js"]
Step 3: Add the Application Code
Add the application files to the docker-image-sharing-demo folder.
server.js:
const http = require("http");
const hostname = "0.0.0.0";
const port = 3000;
const server = http.createServer((req, res) => {
  res.statusCode = 200;
  res.setHeader("Content-Type", "text/plain");
  res.end("Hello, World!\n");
});

server.listen(port, hostname, () => {
  console.log(`Server running at http://${hostname}:${port}/`);
});
package.json:
{
  "name": "docker-test",
  "version": "1.0.0",
  "description": "A simple Node.js app for Docker testing",
  "main": "server.js",
  "scripts": {
    "start": "node server.js"
  },
  "dependencies": {}
}
Step 4: Build the Docker Image
Build the Docker image using the docker build command:
docker build -t my-test-app:1.0 .
This creates an image named my-test-app with the version tag 1.0.
Step 5: Tag the Image
Tag the image for your personal Docker Hub repository. Replace my-dockerhub-user with your Docker Hub username:
docker tag my-test-app:1.0 my-dockerhub-user/my-test-app:1.0
Note: Replace my-dockerhub-user with your Docker Hub account name.
This ensures the image is correctly associated with your Docker Hub repository.
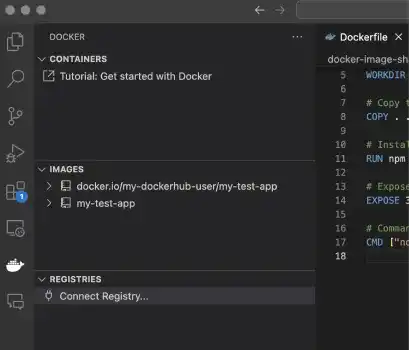
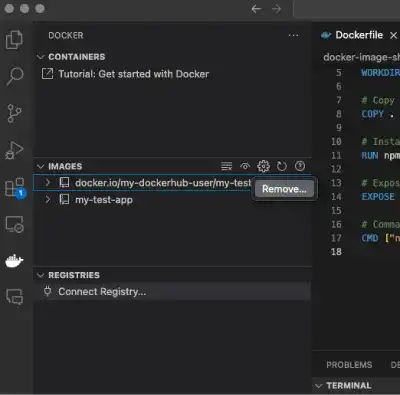
If you are using the Docker extension for VS Code, you can view the images in the sidebar as shown below.
Step 6: Create a Personal Repository on Docker Hub
If you haven't already created the repository on Docker Hub, do so now:
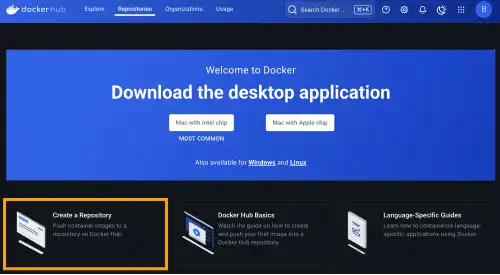
- Log in to Docker Hub and sign in to your account.
- Click Create Repository.
- Set the repository name to
my-test-app. Choose Private in the visibility setting for practice purposes. Click Create to finalize.
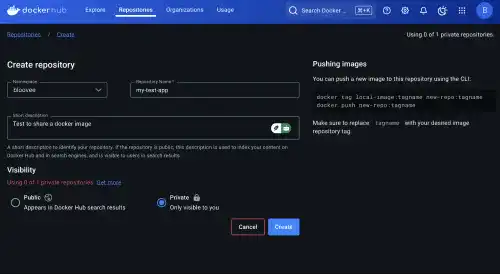
This step ensures that Docker Hub is ready to receive your pushed image.
Step 7: Generate a Personal Access Token
If you’re using a Personal Access Token for authentication, follow these steps to generate it:
- Log in to Docker Hub: Visit Docker Hub and sign in with your credentials.
- Go to Security Settings:
- Click on your profile icon in the top-right corner and select Account Settings.
- Navigate to the Security tab.
- Generate a New Token:
- Click New Access Token.
- Enter a description (e.g., "Push Token for Docker Image Sharing").
- Ensure the token has read, write, and delete permissions for repositories.
- Click Generate.
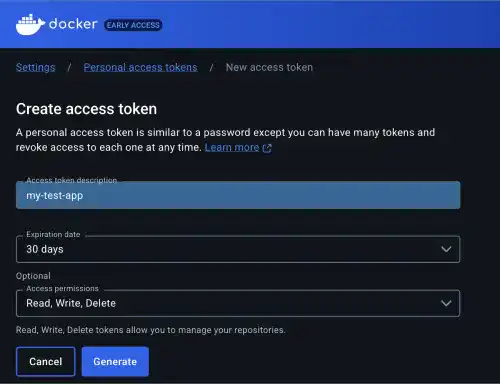
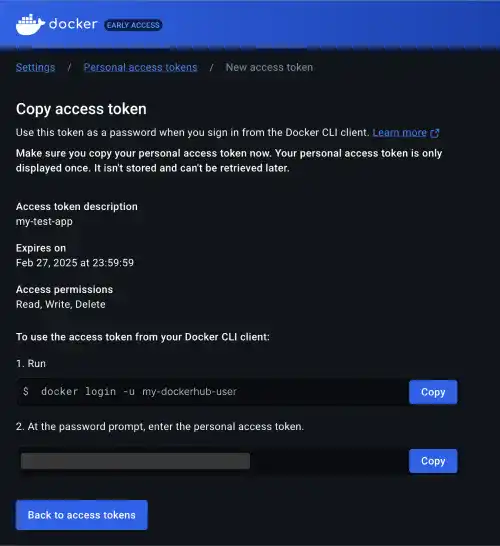
- Save the Token: Copy the token and save it securely, as you won’t be able to view it again.
Step 8: Log in to Docker Hub
Authenticate with Docker Hub using the token:
docker login -u my-dockerhub-user
Note: Replace my-dockerhub-user with your Docker Hub account name.
When prompted for a password, paste the Personal Access Token you generated.
Step 9: Push the Image
Push the tagged image to your Docker Hub repository:
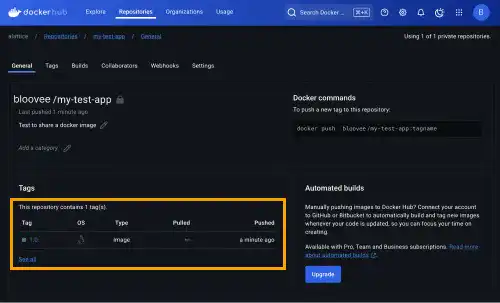
docker push my-dockerhub-user/my-test-app:1.0
Note: Replace my-dockerhub-user with your Docker Hub account name.
This uploads the image to Docker Hub, making it available in your repository.
Step 10: Share the Image
Once the image is pushed, share the pull command with your team or users:
docker pull my-dockerhub-user/my-test-app:1.0
Note: Replace my-dockerhub-user with your Docker Hub account name.
To verify this yourself, delete the image from your local computer and retrieve it using the docker pull command. You can use the VS Code extension to delete the image with the specified tag, as shown below.
Step 11: Delete the Test Docker Image
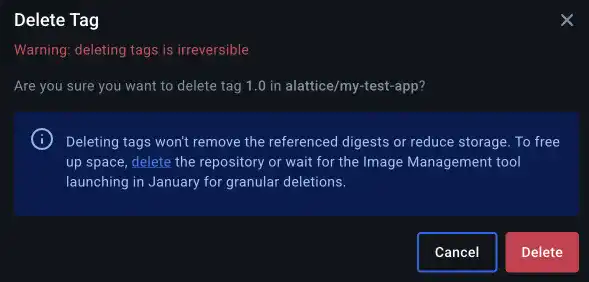
If the image is no longer needed, delete it from Docker Hub to clean up your repository:
- Log in to Docker Hub.
- Navigate to the Repositories section and select
my-test-app. - Go to the Tags tab and find the
1.0tag. - Click the Delete or Trash icon next to the tag and confirm the deletion.
- Also, delete the Docker images on your local computer unless you intend to use them.
Sharing Docker images via your personal Docker Hub repository simplifies collaboration and distribution in containerized environments. This step-by-step guide equips you with the knowledge to create, tag, push, and manage images effectively.
If you’re a beginner, this process might feel complex at first. Take time to master Docker basics, like running containers and managing images locally, before diving into sharing workflows. Once comfortable, revisiting this guide will make the process smoother and more intuitive.