Building Remote Collaboration Practice Environment

If you want to fully understand the remote collaboration approach with Git and GitHub, you need to understand at least two different user perspectives:
- The owner of the Remote Repository
- A collaborator of the Remote Repository
For effective learning on Git and GitHub, creating a practice environment with multiple users is important. There are three approaches you can try:
- Option 1: Practice with someone else. By switching between the project owner and project member roles, you can practice both of them.
- Option 2: Use two computers. If you have two computers, you can experience each role using different computers. In this option, you need to create two GitHub accounts for the project owner role and project member role.
- Option 3: Create two user accounts for OS. Also, in this option, you need to create two GitHub accounts for the project owner role and project member role.
If you are practicing on your own and don't have two computers, a realistic option is option 3.
Here we'll explain how to create a remote collaboration practice environment on your own with a single computer.
In a real-life situation, different developers use different computers, different email addresses, and different GitHub accounts as illustrated in the main figure. The ideal practice environment imitates these real-life situations.
Note: There is a case of a non-collaborator but if you understand the two perspectives, understanding the non-collaborator's point of view should be straightforward.
On this page, we'll cover the following points to establish the remote collaboration practice environment described in the main figure.
- Create two user accounts on your computer (the primary OS user account and the secondary OS user account)
- Prepare a project directory and VS Code with the command line for each user
- Prepare a browser for each user
- Prepare GitHub accounts for each user
As we haven't explained a project-specific setup, the following approaches will be explained in the next chapter
- How to create a Local Repository
- How to create a Remote Repository
- How to create a link between the Local Repository and the Remote Repository
- How to grant the Remote Repository access
Practice
Objective:
Set up the remote collaboration practice environment
In this practice section, we'll explain the approach using the Mac OS example. Regardless of the OS you use, you can usually create more than one user account on your computer.
For Windows OS, there are additional explanations at the bottom of this section.
1. Creating two users on your computer
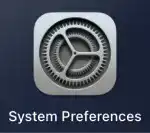
Open System Preferences.
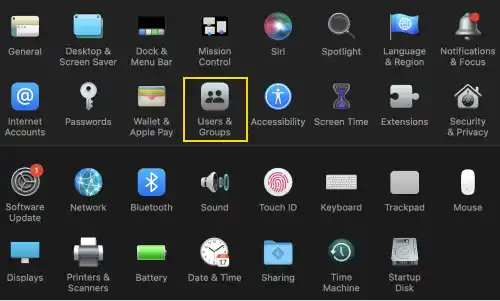
Select Users & Groups.
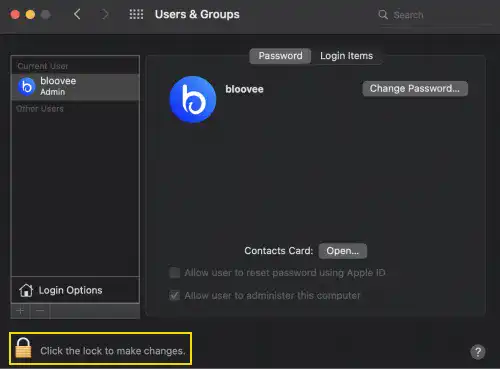
Unlock to make changes.
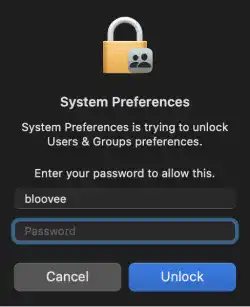
Enter your password to unlock.
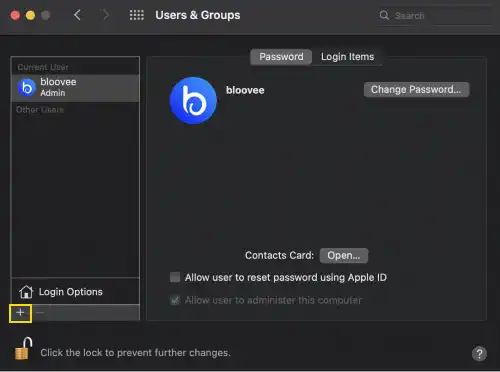
Click on the + button.
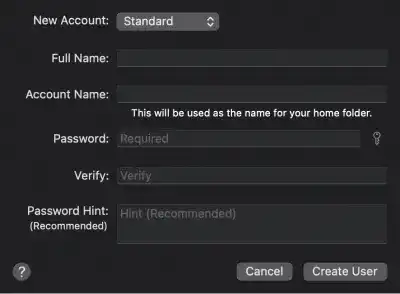
Type your user name under the Full Name section. Account Name is automatically filled. Account Name is used for the home folder name that is shown in the command line.
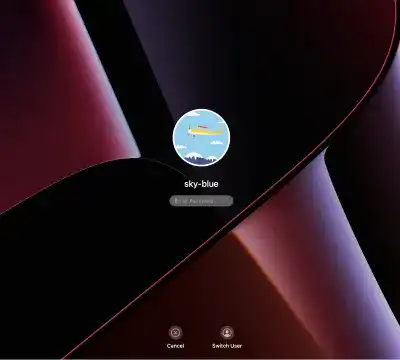
Once you create a new account, you can also customize the user icon.

To switch the user, lock the screen and select Switch User.
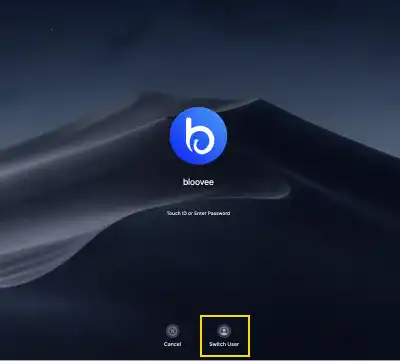
Now, you can log into the system with the new account.
2. Prepare a project directory and VS Code with the command line for each user
Next, you need to create another local environment with a text editor and command line.
Locate the VS Code App and register it in the Dock
As you have already installed VS Code, you should be able to access VS Code. In the Launchpad, search VS Code.
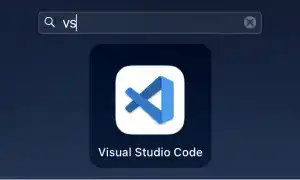
Bring it to the Dock for easy access.
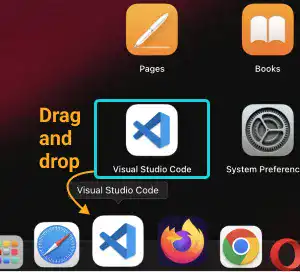
Create a main project directory in each OS account
Create a main project directory for practice for each account. For example, we use the following project directory names.
- Dev_A_bloovee for Developer A's project directory
- Dev_B_skyblue for Developer B's project directory
Create the directory under each user's home directory. You can create it using the OS GUI (Graphic User Interface) or using a command line.
Option 1: Use GUI to create the project's main directory
For Developer A (Project Owner Role)
Create a new directory using your main OS user account used for the project owner role (Developer A). The screenshot below shows the directory structure including the directories that will be created in the later chapters. At this point, create the project's main directory (e.g., Dev_A_bloovee) under your primary OS user account directory.
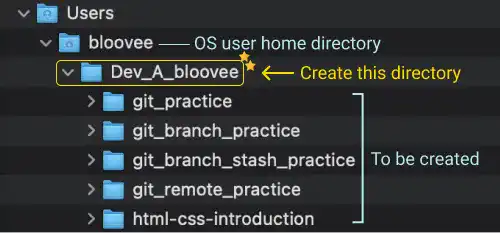
For Developer B (Project Member Role)
Create a new directory using your secondary OS user account used for the project member (collaborator) role (Developer B). The screenshot below shows the directory structure including the directories that will be created in the later chapters. At this point, create the project's main directory (e.g., Dev_B_skyblue) under your secondary OS user directory.
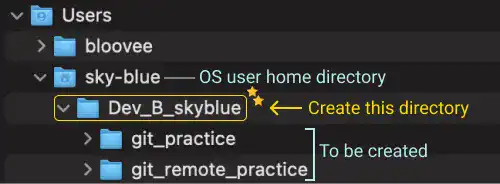
Option 2: Use the command line to create the project's main directory
If you use a command line, run the following commands from each user account. To run the command from each account, you need to switch the user in the OS. You can use account names of your choice.
For Developer A (Project Owner Role)
Run the following commands from your main OS user account that is used for the project owner role (Developer A).
cd ~
mkdir Dev_A_bloovee
cd Dev_A_bloovee
pwd
After running the commands, you can confirm your current working directory path as shown below.
/Users/bloovee/Dev_A_bloovee
For Developer B (Project Member Role)
Run the following commands from your secondary OS user account that is used for the project member (collaborator) role (Developer B).
cd ~
mkdir Dev_B_skyblue
cd Dev_B_skyblue
pwd
After running the commands, you can confirm your current working directory path as shown below.
/Users/bloovee/Dev_B_skyblue
Set up VS Code and the command line
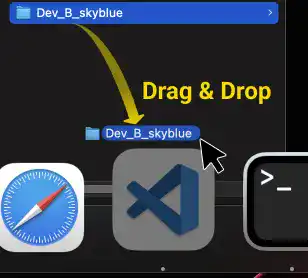
For the secondary account, we haven't used VS Code yet. To open the project directory using VS Code, drag & drop the directory onto the VS Code icon.
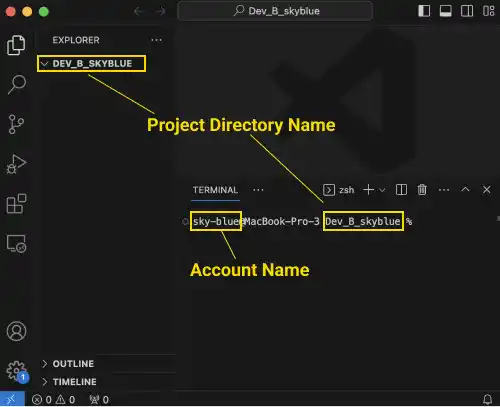
Open a command line in VS Code by selecting New Terminal under the Terminal menu on the top menu bar. You'll see that your account name is shown in the command line and the project main directory is set as the current working directory.
Complete the git config settings
As you created a new OS user account, you need to do the git config settings for the user as well. Check this link for the git config command Git User Settings – git config.
3. Prepare a browser for each user
As GitHub uses a browser cache for the user login, it is also better to set up two browsers. If you use Chrome, you need two Gmail accounts.
Developer A's browser example

Developer B's browser example

4. Prepare GitHub accounts
Create another GitHub account using your second email. If you already have two accounts, for example, a private account and a work account, you don't need to create a new one.
For your secondary account, check Create GitHub Account.
Here are examples of GitHub accounts used in the practice sections.
Developer A's GitHub account example

Developer B's GitHub account example

For the new account, you also need to prepare a communication protocol (HTTPS or SSH) to access GitHub from your command line. Refer to the following pages for the setup.
 Additional explanations for Windows users
In this section, we'll explain key points that are different from the ones on Mac OS.
1. Create two user accounts on your computer
To create a new user account on your Windows, follow the steps below.
- Open Family & Other Users settings
- > Select Start
- > Settings
- > Accounts
- > Family & Other Users
- Add a new user
- Press "+ Add someone else to this PC"
- Click on "I don't have this person's sign-in information"
- Click on "Add a user without a Microsoft account"
- Register your username and password with key questions when you forget your password
- Switch the Windows user to the new user
2. Prepare a project directory and VS Code with the command line for each user
Preparing VS Code
For Windows, you need to install VS Code for the new Windows user account. You also need to add Git Bash to the terminal. Check this link Key Tool Preparation (2) – Windows.
Preparing main project directories
You can follow the instructions in the Mac OS section above. To create a main project directory, you can use both GUI (Graphic User Interface) and the command line. When using Git Bash, you can use the same commands explained in the Mac OS section to create a main project directory.
Prepare VS Code shortcut
For Windows, make sure that the VS Code shortcut icon has been created on your desktop. If not, create the shortcut icon. Use the desktop icon to open the project directories as Windows doesn't have the same functionality as Mac's Dock has.
3. Prepare a browser for each user
Follow the instructions in the Mac OS section above.
4. Prepare GitHub accounts for each user
Follow the instructions in the Mac OS section above.